Doughnuts totally fit into the category of sweets you might consider only eating when you make them yourself. I understand Michael Pollan’s thinking when he states something similar in Food Rules; beyond the fact that it’s not really possible for me to eat a good doughnut anywhere (they’re either gluten-full or GF cake doughnuts, meh), they are sort of a pain in the ass to make.
I’m not going to make them all the time, so it doesn’t really matter that they have zero nutritional value (dropping in a frying pan and dipping in/injecting with sugar don’t do any nutritional favors either).
This recipe is slightly advanced, but I have faith in you beginners. Please ask me any questions you encounter along the way. You could omit the electric mixer and mix by hand (just have a really good rubber spatula on hand to make sure all ingredients get incorporated well in your bowl). I’ll give you fair warning, whether you’re hand or stand mixing, the dough is really sticky! If you’re a novice fryer, read the homemade tortilla chips post for some extra frying tips.
Most importantly, plan ahead: Have your eggs, milk and half-and-half at room temp before you start!
Gluten free yeast doughnuts
yield 12 doughnuts, based loosely on Emeril’s doughuts
1. Proof yeast in a small mixing bowl by combining:
- 1 packet active dry yeast
- 1 tsp sugar
- 1/4 cup of warm water (110 degrees)
Stir to dissolve clumps of yeast and set aside.
2. Mix flours in large mixing bowl:
- 1-1/2 cups white rice flour
- 1 cup arrowroot starch
- 1/4 cup sorghum flour
- 2 Tbs sweet rice flour (also called mochiko)
- 2 Tbs cornstarch
- 2 tsp xanthan gum
3. In a stand mixer with the paddle attachment, beat until thick and pale yellow in color:
- 3 eggs (at room temp)
- heaping 1/3 cup sugar
4. Set mixer on low speed and add
- yeast mixture (now puffed up)
- 2 Tbs melted butter
- pinch salt
- 3/4 cup whole milk, room temp
- 1/4 cup half-and-half, room temp
5. Add the flour mix 1/2 cup at a time. Mix on low speed until all ingredients are completely incorporated. Increase speed and beat for 5 minutes on high; the batter will be thick, light and thread-y.
6. Prepare a large baking sheet by greasing well it with vegetable oil (or another innocuous oil, not olive). Take off any rings on your fingers and grease your hands, finger tips, backs of hands with the oil, too.
7. Use a spoon and drop large dollops (about the size of a racquet- or hand-ball) of the batter directly onto the greased baking sheet. Don’t mess with them until after you scoop out all the batter from the bowl. About half way through dolloping, the batter will start sticking to your finger tips, don’t fret. Carry on as best you can.
8. Re-grease your hands and shape your doughnuts as big or small as you’d like. Don’t touch them too much, just smoosh them down with the flat part of your palm so they’re about a half-inch thick. If you want traditionally shaped, hole-in-the middle doughnuts (make sure your finger tips are entirely greased, nail and all) and poke a hole in the middle of the dough flats. Spread out the hole with your fingers. This part may be frustrating since you might need to re-grease a few times. Be as patient with the dough as possible. [It’ll be so worth it later.]
I made holes in half of the dough rounds and then left a few alone for filled doughnut adventures.
7. Cover the dough with a greased piece of plastic wrap (this will prevent the dough from sticking to the wrap) and let the dough rise until it has doubled in size, which will take 1-2 hours.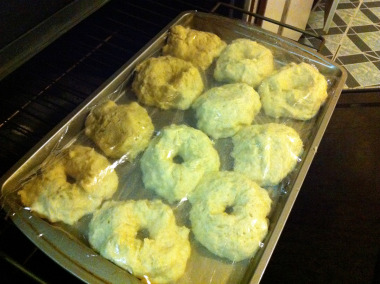
8. When dough has doubled, prepare a frying pan with enough vegetable (or neutral) oil for the doughnuts to be completely suspended. Fry until golden brown, about 3 to 4 minutes, flipping occasionally for overall browning. Carefully remove the doughnuts from the oil and drain on a paper towel-lined plate.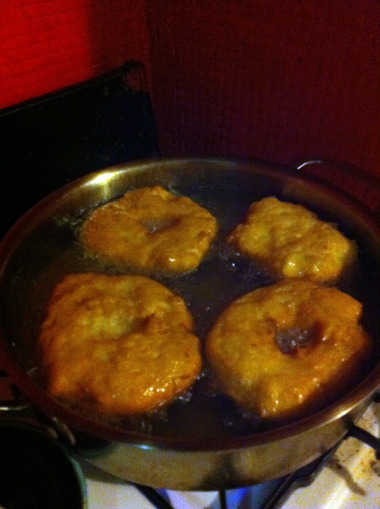
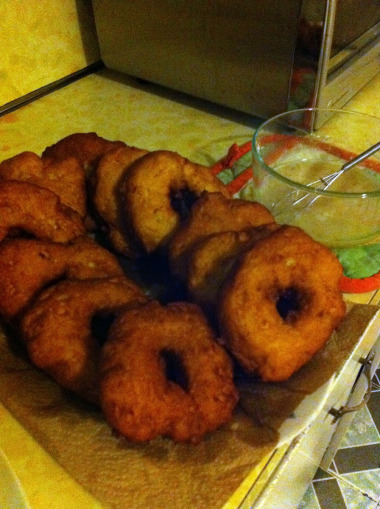
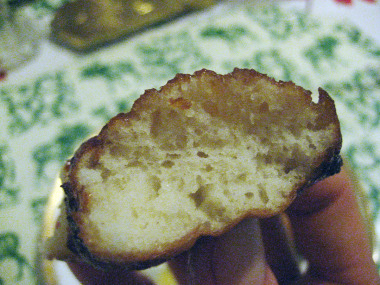
9. Fill, glaze and try not to eat them all in one sitting. We filled the rounds with variations of creme anglaise, lemon-lime curd, all kinds of sweet spreads and preserves and even a little whipped cream. We glazed using my friend Grace’s suggestion: 2 Tbs honey warmed into a looser liquid, add 1/2 cup powdered sugar and enough water (or milk) to make it a syrupy paste. Dip or spoon glaze over doughnuts.
(My Betty Crocker icing injector thingy didn’t work out great for this task since our filling wasn’t as thick as desired. I certainly didn’t mind dipping my doughnut in globs of deliciousness.) Enlist feline support if necessary.p.s. Next day doughnuts can be turned back into just-out-of-the-fryer bliss after a little trip into the toaster oven. Be sure to use a sheet of tin foil underneath if you’ve already glazed them.