 While the East Coast was being pummelled with snow over the weekend (sorry friends!), I was outside in our beautiful Austin weather demonstrating this simple method for creating your own probiotic slaws and krauts at the farmers’ markets. No matter where you live, you can take this ratio of salt to veggies and create your own unique slaws and krauts to promote a healthy gut, aid in digestion and get your probiotic immune boost!
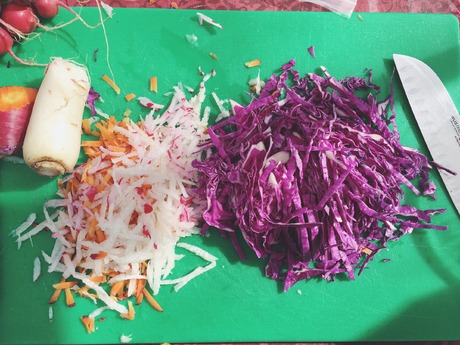
- If using a cabbage in your slaw, cut it in half spitting the core in two, cut out the triangle of core and hang on to that if you want to use it as a weight, shred the cabbage as thinly as you can. Shred any other assortment of veggies (carrots, daikon or other radishes, beets, etc.) using the large side of a grater.
- Weigh out 1lb of your shredded veggies. A good guideline if you don’t have a scale is that approximately 1lb of shredded veggies fit into a pint jar when pressed firmly down, 2lbs fit in a quart jar.
- Add 2 tsp fine sea salt to the shredded cabbage and veggies directly in the bowl. Massage it until it starts to seep water out.
- Optional: Add any or all of the following to a pint sized jar before you pack in your cabbage and veggies: ½ tsp. dill seeds (or one sprig of fresh dill), 5 black peppercorns, 2 juniper berries, and/or ½ tsp. of any whole spice of your liking.
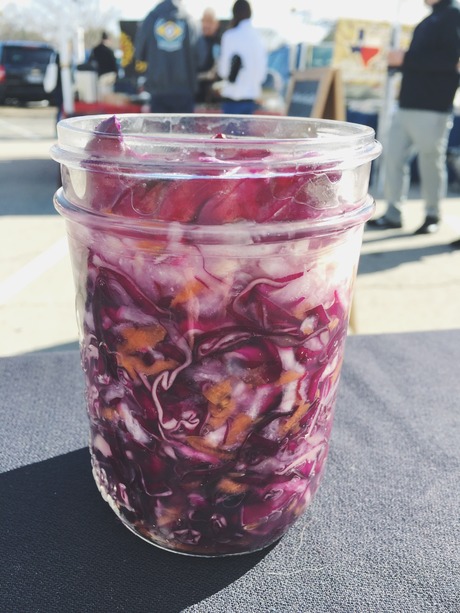
- Pack it all into your jar, smashing it down as you go to release more of the liquid from inside the cabbage and veggies. Be sure to leave 1 inch of headspace (where the brine reaches on your jar when pressing down firmly on the veggie shreds) to allow for additional brine creation without overflow.
- (optional) Place an intact outer leaf on top of your kraut to keep the shreds below the brine and use the core to weight it down.
Fermenting your slaw:
- Cover the jar: Cover the mouth of the mason jar with a cloth or paper towel and secure it with a rubber band or twine. You may want to put your jar in a bowl or on a dinner plate as the liquid may bubble out of the top of the jar as more brine is created from the salt extraction process.
- Press the cabbage every couple hours: Over the next day, press down on the large cabbage leaf (if using). As the cabbage releases its liquid, it will become soft and compact and the liquid will rise over the top of the cabbage.
- Add extra liquid if needed: if after 1 day, the liquid has not risen above the cabbage, dissolve 1 teaspoon of sea salt in 1 cup of filtered water and add enough to cover the cabbage.
- Ferment the cabbage for 5-10 days: While your cabbage is fermenting, keep the jar away from direct sunlight and at a cool temperature (65-75 degrees F ideally). Check it daily and press it down if cabbage is floating above the liquid. Because this is a small batch of sauerkraut, it will ferment more quickly than a larger batch. Start tasting it after 3 days, when it tastes good to you remove the cloth, screw on the metal lid and refrigerate.
While it is fermenting you may see bubbles coming through the cabbage, foam on the top or white scum. These are all signs of a healthy, happy ferment. Skim off the scum if you see it forming to prevent mold from growing. If you see any mold, skim it off immediately and make sure your cabbage is fully submerged in the acidic brine. Don’t eat moldy parts close to the surface, but the rest of your kraut below the brine is fine. It is also normal for the top layer of veggies to brown slightly, this is just oxidation and completely safe to eat, nothing to be worried about.
Store the kraut for several months in the refrigerator! This sauerkraut is fermented and now acidic enough to inhibit the growth of spoilage microbes. It will last for months so long as it stays pristine (no double dipping!) and tastes good to you.