Freezing citrus zest

The bounty of citrus in winter months never fails to incite frenzy to save every bit and bob from these fragrant fruits. I taught this workshop over the weekend and have many posts on the blog (here, here and here to name a few) dedicated to using up citrus from rind to seed.

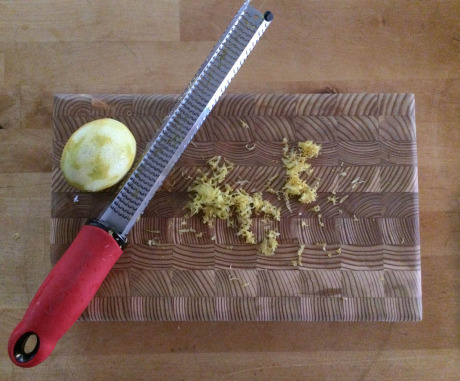
Freezing zest is a great way to add bright, freshness to your baked goods and dinners throughout the year when your citrus bounty is nonexistent. Start by zesting the fruit. Then cut out a few 6” x 6” parchment paper squares and divvy the zest into 1 tsp measures onto the papers. Fold them up tightly.

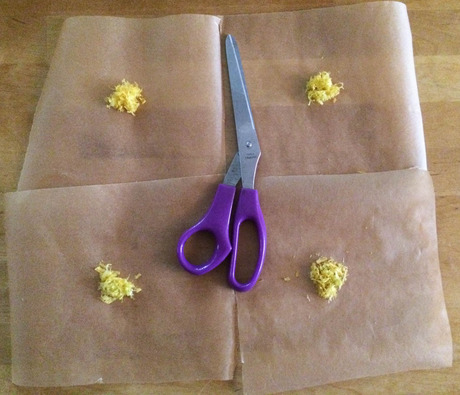
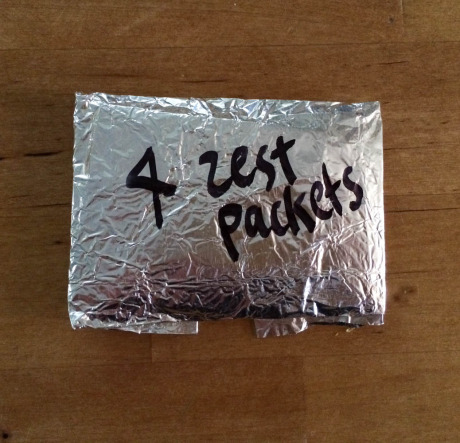
Wrap your folded packets in a piece of tin foil (and don’t forget to date them!). Throw this bundle in a freezer bag for one more layer of volatile oil protection! Try to use these within 6 months for maximum zing.

Defrosting on the fly

The last hip trick was all about freezing stuff, so this week’s post will be about unfreezing. Ah, defrosting. Leisurely defrosting is the kind of thing people who plan ahead do. To be one of those kinds of kitchen people, I strive. 

The plan-ahead people will usually safely defrost by just putting something in the fridge and cooking it the next day when it’s fully defrosted. Well, for the non-plan-ahead types, running something under a tiny stream of cold water (for a maximum of 2 hours) is also an acceptable way to defrost, and quickly at that. However, I don’t feel so great about letting all that water trickle down the drain.

I used a gallon jar (another great way to use them around the house) to capture batches of water as we defrosted some fish filets last night. Yes, you have to periodically monitor the progress of the jar, but your houseplants (or trees or garden) will be so happy you did.

Cold-brew tea

Summertime heatwaves mean my desire to even boil water goes lower on the list than folding laundry. This hip trick is a reminder that you don’t need hot water to make tea. Let room temp or cold water, tea bags or loose tea, and a little time in the fridge work for you.

I love cold-brewing and wrote a post about it with ideas for fun cold brew infusions. The pitcher pictured above is about 2 liters’ worth of water steeped in the fridge overnight with 5 blueberry teabags. Voila, blueberry iced tea.


Peeling garlic cloves

This hip trick comes to us courtesy of my brother-in-law, Nick, and a recent reminder from Hank Shaw. I’m constantly fermenting garlicky dill pickles, my favorite flavor combo, and when the garlic stares me down I now use a trick that works sort of like magic. 

You can do the original method, finding two metal bowls of roughly the same size and then sticking the broken apart, but unpeeled garlic coves inside one of the bowls. Make a dome over that bowl with the other, hold really tight and shake wildly. Remove the peeled cloves and shake it out until all of them are relieved of their dry skin. 

I tried this in my metal cocktail shaker and was surprised by how well it worked, and within something I’m used to shaking with ease (the bowls can be unwieldy). Make sure you clean it out really well with hot soapy water before you make your next round of margaritas, though!

Ginger peeling made easy

I learned this tip from students at the Auguste Escoffier School of Culinary Arts, where I teach preserving classes to students in the Farm to Table Experience.

Skip trying to carve the skin off your ginger with a paring knife; you’re likely trimming away valuable ginger. Instead, take a teaspoon and scrape downward with the tip of the spoon (where you eat from) in small strokes as if you’re whittling. Ginger freezes well, peeled and unpeeled, and you can use this peeling tactic with a frozen hunk of ginger as well.

Taming the spice stash

I was delighted when a friend brought me a bunch of little glass vitamin jars last year. With a little citrus oil (to remove gunky labels) and a bottle brush to give them a good interior cleaning (and rid them of their previous inhabitants’ odor), I was finally able to create homes for the lingering spice bags in our drawer.

When considering containers for reuse keep in mind that they should be glass, and, if possible, opaque to keep light from taking a toll on freshness. Add a few shakes of baking soda, fill with hot water and soak overnight to rid odor from persistently stinky jars. 

Use a metallic sharpie for labeling the glass jar; erase with rubbing alcohol if your containers’ contents change.

Make pie, not waste

This hip trick comes to us courtesy of my friend Ashley English, kitchen, home and small-scale farm diva over at Small Measure and author behind a whole bunch of great books, including A Year of Pies (which features one of my pie recipes!).

Ashley shares with us this ‘tis-the-season, pie-related hip trick, “Most pie recipes tell you to form the pie dough into two balls, wrap them in plastic, and then place in the refrigerator or freezer. I hate waste, and, as such, never use plastic wrap. Instead, since most recipes call for two sticks of butter, I hold onto the butter wrappers, and then sandwich them in between the flattened dough disks. The dough disks, cradled inside their butter wrappers, then either go into a lidded glass container (my typical M.O.) or a resealable plastic bag (which I’ll clean and use over and over again). That way, the dough disks don’t stick together and I’ve eliminated the need for plastic cling wrap at the same time. Win-win!”

DIY knife block

This hip trick comes to us courtesy of Paula over at Springdale Farm, not too far from my house in East Austin. I was recently in Paula’s kitchen for the Austin Food Blogger Alliance’s cookbook photo shoot and this little gem came to my attention.

Paula told me about how their lovely knife block was an idea she saw in a magazine. They personalized the idea with a box that’s made from shiplap wood from their home’s renovation. Your box can be something personalized like this, or even a repurposed vintage container/jar you love filled with wood skewers. If your proposed knife block container is shorter than the skewers, just snip the skewers with a wire cutter and place them cut-side down in the container so they’re flush with the top.

Cleaning with vinegar, without the smell

I share this hip trick with my Green Your Cleaning Supplies workshop attendees. Do you like the idea of cleaning with something non-toxic, but hate the smell of vinegar?

Peppermint essential oil to the rescue! Add about 10 drops of a pure essential oil (no synthetic fragrances or you’re defeating the purpose of non-toxic cleaning) to your half vinegar-half water spray bottle. Of all the essential oils I’ve tried, peppermint is one of the few that actually masks the odor of the acetic acid in vinegar. Not a mint fan, try clove or eucalyptus which are also strong oils. 

Give a few sprays to your counter top, bathroom mirror, sticky floor and voila; you’re cleaning with a Thin Mint.

Blueberry infused vodka

Take your summer celebrations up a notch with a handful of blueberries sliced in half and dropped right into a 375ml bottle of vodka, or use a cup of sliced berries for a 750ml bottle. (Don’t break the bank on your infusing vodka, a low-end vodka is a perfect base.)

Let it sit at room temperature for a week (or for up to three). Strain and enjoy with club soda, lemonade or your favorite fancy flavored soda. Store at room temp or in the freezer.

Summer sipping

This hip trick comes to us from herb maven and non-toxic bodycare goddess Liz, of Raganella. We stayed with Liz during our recent trip back to NYC and she reminded me about how wonderful it is to sip infused water all summer long.

Her go-to, refreshing beat-the-heat flavors are cucumber, mint and lemon, either one or a combination of all three! Liz recommends a more medicinal version of oat tops or oat straw and rose petals for a cooling and relaxing effect. Simply slice any fruit/veggies thinly and place in the bottom of a pitcher, fill and refill with water and refrigerate (or don’t) and enjoy throughout the day. The herbs and aromatics will continue to flavor the water on the upwards of 24 hours. Pour over a strainer if you have loose herbs or debris that spread out in the water.

A delicious way to use citrus peels

This hip trick comes to us courtesy of my Hudson Valley pals, Julia and Kaela. Kaela put me up during my travels in the area and we ate our way through the weekend, as to be expected!

Prior to my arrival, she stuffed spent citrus peels and rinds inside a chicken and roasted it over potatoes and vegetables, which also had a few large citrus halves (any smaller and you’ll bite into them accidentally after roasting) tossed in for good measure. What a delicious way to use trash!

Freezing homemade bread


People buy bread from the store primarily because it’s easy to store. (I say that because once you get on a roll with making a loaf weekly, the work of making homemade bread sort of goes away.) Well, now you can keep your loaf around for the week without biting into a piece of driftwood by the end of the week.

Slice your loaf once it’s completely cool (yes, I mean really cool, not warm). Cut squares out of a larger piece of parchment paper and layer them in between each slice of bread in a brand new, gallon-sized freezer bag. Remove air with handy vacuum seal trick (optional), and stash in the freezer. Pull out a slice or two and just defrost them with a short toasting as needed. You can re-use your parchment squares and your freezer bag (until you don’t get a good seal on the bag any longer), just keep the empty bag with parchment in the freezer between uses.

Make limeade

This hip trick comes to us courtesy of my friend and fabulous yoga teacher, Amy, who often works with kids and has a handful of snacks and treats up her sleeve for any instance.

Here’s one of her latest kid-friendly bev ideas. Have a lime on hand? Cut it in half and squeeze each half into two 8-10 oz cups respectively, fill the rest of the way with water and a drop of stevia extract (or pinch of xylitol or just plain sugar) and you have instant summer refreshment. For added fizz and pizzaz replace regular water with club soda.

Use permaculture in the kitchen

Let one part of your dinner cook another! I steamed our greens over broth and brats by using this wire mesh strainer and placing a lid over the whole shebang for about 5 minutes.

Obviously this’ll largely depend on what you’re cooking on a given evening and won’t apply to all dinners, but it’s a fun thing to try and identify when you can skip extra pots and steps. You can read up on Permaculture and home/interior applications of the principles of it in my book!

Don't get mad, get mad scientist on your kitchen disasters

This hip trick comes to us courtesy of Trish in Austin, TX.

If you happen to burn something in a pan, empty out all the burnt food, and while the pan is still hot, sprinkle the burned area with salt. You will need to make sure the salt covers the whole burned area then pour distilled white vinegar on the salt. It causes a chemical reaction that lifts the burned stuff right off, slick as a whistle.

Sweet endings, make jelly milk

This hip trick comes to us from Mary Elizabeth Rienzo Noll from Bayside Queens via her fab daughter Bernadette, co-founder of Future Craft Collective.

Whenever you find yourself at the bottom of a jam jar, use this depression-era trick for a treat. Pour the milk of your choice over the last scrapings of jam, add an ice cube and put the cap on it. Shake it like crazy, or better yet, have your kids shake it. Pop it open and enjoy your yummy shake treat! (You probably recall a past Hip Trick, showing how jam jar ends can also become to-go, fruit-on-the-bottom yogurts.)

Homegrown jamming: preserving tiny amounts of produce

If your strawberry plants are anything like mine, you’re lucky to get one or possibly (spectacularly) two berries every few days. Hardly a jam-worthy lot. Hardly even an ice cream toppings for two lot.

Well, if you have a bit of perseverance and a freezer, you can make a small jar of your homegrown berry jam. Freeze your berries little by little by following the how-to in this post on freezing berries for future jamming. Wait for your next “harvest” and repeat! When you have a half pound’s worth stashed in your freezer bag, make half of this recipe and enjoy a half-pint of your homegrown jam.