
I know what you’re thinking.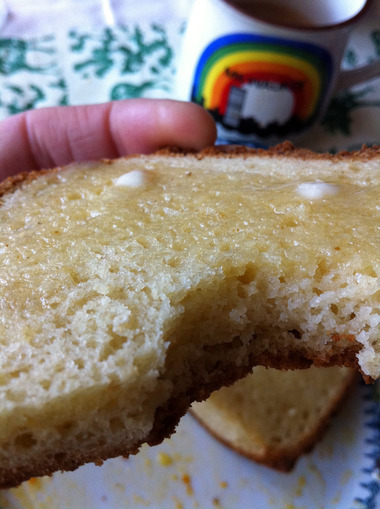
I really am all for whole-grain, but don’t get me wrong, sometimes you just want a piece of bread that’s going to let your peanut butter and (homemade) jelly be the star of the show, and not the nutty, grainy goodness of your interesting bread loaf.
The only disappointing thing about my everyday, whole-grain loaf is its shape when baked in the oven instead of in the bread machine. On this account, I’ve upped the loaf size here (and will do so for the oatmeal millet bread linked above sometime soon, too) so you get some of that exciting rounded-top, loaf-exploding-from-the-loaf-pan action. Since most people don’t have bread machines (though I’d highly recommend getting one if you’re going to be baking gluten-free bread with any regularity), I’ve written this recipe specifically for the oven.
This loaf received the moniker, Bread for the People at our last food swap. I whipped it up as a vehicle for people to sample my Meyer lemon star anise marmalade. I wanted something simple, but not completely flavorless and dense. It also needed to remain spongy and fresh for a few hours (no toasting required!) to accommodate intermittent sampling during the swap. The name stuck after my swap co-host, Megan, and house host, Sarah, both avid gluten-eaters, raved about not being able to tell it was gluten-free; “It’s truly bread for the people!”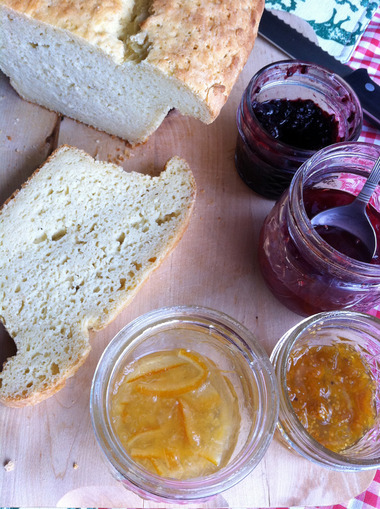
Here, my friends, I’m happy to give you Bread for the People. Go forth and make PB & J’s.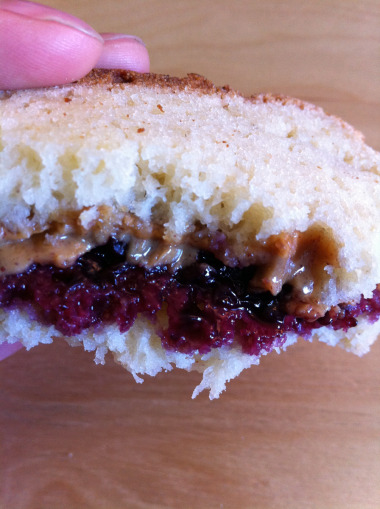
Note: I eat sugar, eggs and dairy products, so I haven’t tried modifying this for those who are not blessed digestively to handle these ingredients. I’d love to hear about how your substitutions go.
Bread for the People
makes one big loaf (or two standard-sized loaf pans)
Set 4 eggs out out on the counter an hour or two before you’re ready to bake.
1. Combine 1/4 cup 105-110 degrees F water with 2-1/2 teaspoons active dry yeast (this is one yeast packet and some change). Let sit to dissolve while you get your dry and wet ingredients ready.
2. Combine your flours in a large mixing bowl:
- 1-1/4 cup white rice flour
- 1-1/4 cup tapioca starch
- 3/4 cup brown rice flour
- 3/4 cup sweet rice flour
- 1/3 cup oat flour (I grind up gluten-free oats in my food processor), never you mind this sneaky inclusion of a healthier, non-rice grain.
- 2 tsp xanthan gum
If you’re using a store-bought all-purpose GF flour mixture, then just use 4 cups of that here (make sure it’s just a mix of flours, starches, maybe a pinch of sugar and salt, and xanthan gum, some mixes include baking soda and other leaveners).
3. Add the rest of your dry ingredients (yes, even if you used a flour mix):
- 1/3 cup sugar
- 2 tsp salt
4. If you have a stand mixer, use it. If you don’t, then be prepared for some arm muscle exercise. Do not use a hand mixer; this bread dough will kill it. In the bowl of your stand mixer, use the paddle attachment and mix thoroughly the following:
- 4 room-temp eggs
- 5 Tbs butter, melted (Don’t pour scalding hot butter directly on the eggs or they will curdle. Let it cool off for a bit before you dump it in.)
- 1/2 Tbs cider vinegar
5. Add your dry mix to the wet stuff in the mixer in 1 cup increments to allow the ingredients to incorporate fully. Add the yeast/water mixture and then slowly add anywhere between 1 and 1-1/2 cups warm water (105-110 degrees F). You’ll want the consistency of the batter to be stringy and moist, though not soupy. Once the water is incorporated fully, mix on med-high for about 10 minutes. If you’re mixing by hand, practice your yogic breathing and try not to tense up from such rigorous mixing. You’re developing a light fluffy gluten-like structure for air pockets to form when your bread is rising.
6. Grease really well your favorite large loaf pan. Use a good quality spatula and scrape the batter into the greased loaf pan. Cover loosely with greased plastic wrap and let rise for 1-1/2 hours.
7. After your dough has doubled in size, preheat your oven to 400 degrees F. I like to brush my loaf top with melted butter for browning (and, of course, added yum).
Bake for 20 minutes at 400 and then decrease temperature to 350 and bake for 10-20 more minutes. You’ll know it’s done when you stick a meat thermometer in the loaf and it reads 190-200 degrees F. Remove from loaf pan and let cool completely on a wire rack.
Bread machine modification
1. Combine your flours in a large mixing bowl:
- 1-1/4 cup white rice flour
- 1-1/4 cup tapioca starch
- 3/4 cup brown rice flour
- 3/4 cup sweet rice flour
- 1/3 cup oat flour (I grind up gluten-free oats in my food processor), never you mind this sneaky inclusion of a healthier, non-rice grain.
- 2 tsp xanthan gum
2. Add the rest of your dry ingredients (yes, even if you used a flour mix):
- 1/3 cup sugar
- 2 tsp salt
3. Whisk together your wet ingredients
- 4 room-temp eggs
- 5 Tbs butter, melted (Don’t pour scalding hot butter directly on the eggs or they will curdle. Let it cool off for a bit before you dump it in.)
- 1/2 Tbs cider vinegar
- 1 cup room temp water (between 80-100 degrees F)
4. Pour wet ingredients into the pan of your bread machine and then layer dry mix on top. Make a hole an inch or so deep in the dry flour mix and pour in it the contents of an active dry yeast packet (or 2.25 teaspoons bulk active dry yeast).
5. Program your machine to the equivalent of a basic rapid setting, which should take between 2 and 2.5 hours to complete.