
When life hands you lemons, the only reasonable thing to do is make muffins. Meyer lemon vanilla muffins, that is.
I’ve had a pretty shitty week (I won’t get into the boring, soggy annals—this week felt like a year—of complaint) but I’m bright-siding it with a few major successes, one being that my book proposal is finally out drifting on the sea of editors’ desks! The other successes involve digestion, barter and butter.
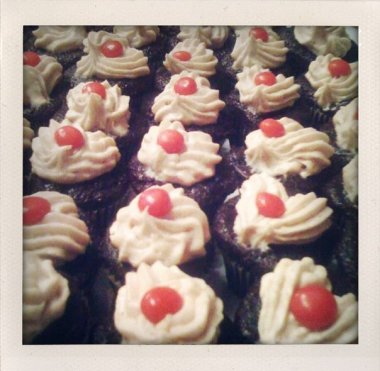 Red Hots for the Red & Black PartyLet’s back up for a moment. I’m participating in a writing workshop (for grown-ups, yippee!!) hosted by the fab Aaron, executive director of the New York Writers Coalition. Though the workshop is very reasonably priced, I’m not really in a position to pay money for much beyond food and books these days. I suggested a barter; hell, I must be good at something they need, right? [FYI, new 10-week session starting in March for those of you NYC’ers who may be interested in unpacking your life on the page]
As it turns out, they needed cupcakes. I can DO cupcakes. And muffins.
The Red & Black Party is NYWC’s annual cocktail party salon, where we mingle, martini-clad with people who care about the fate of a literary- and literacy-influenced world. These are people who are making life in the modern world manageable, through stories of existence—banal, exotic and poetic—my kind of people. Like this guy:
 Kevin Townley, from the marble pedestal
 chocolate martini loveI wore a blue velvet dress with a red belt and boots. There’s no attending a literary party without dressing up as my favourite Victorian novel…As it also turns out, I’m pretty clumsy with a fancy cup. I ended up with chocolate martini all over my cowgirl boots. Oh, well. We can’t be good at everything now, can we?!
So, let’s get down to business: You making these gluten free marvels.
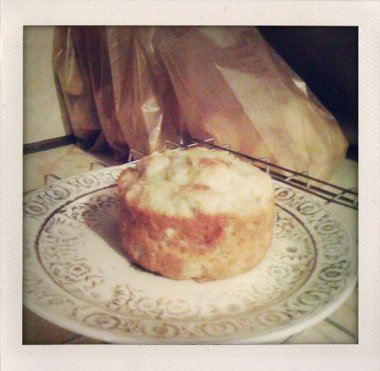 Not one person at the party knew these were gluten free. So, go on tricksters! Do try this at home.Meyer Lemon Vanilla Muffins, Gluten Free
crazily adapted from Natalie Naramor’s carrot zucchini muffin recipe, takes about an hour from start to finish on your first time through. Successive attempts will take less time!
Muffins are so easy. I mean it.
The formula: Dry ingredients + Wet ingredients = Gooey mixture, which is dropped in muffin cups, baked, and devoured.
Step 1: Preheat your oven to 375 degrees.
Step 2: Prepare your muffin tin, either drop in paper cup liners or grease the tin with a melted butter brushing.
Step 3: In a large mixing bowl, combine (whisk) the following dry ingredients:
2/3 cup sorghum flour
2/3 cup white rice flour
2/3 cup tapioca flour (you may substitute with arrowroot or corn starch in a pinch)
3/4 cup sugar
3/4 teaspoon xanthan gum
2 teaspoons baking powder
3/4 teaspoon baking soda
1/2 teaspoon salt
Step 4: Prepare your lemon. I highly recommend using one large (or two small) Meyer lemon(s)*. They’re in season right now, so look for them at your local market, probably a Whole Foods or something of the like is your best bet.
I’ve made these muffins twice, and both times prepared my lemon differently, try one of these two methods:
(1) chop chop
Wash your lemon well, since you’re using the whole thing, rind and all. Use a good sized cutting board so you don’t lose juice in the chop process. Slice it into slivers, and pick around through the slivers to remove seeds (very important!); seeds will make your muffins bitter! Once you’ve sorted the seeds out, chop the hell out of the slivers, mince as finely as you can.
(2) food processor
Haaaaalelujah! So, for this method, cut your lemon in half. I ended up using my hand juicer thing (which catches the seeds in its strainer tray) and then dropping the gutted peel halves into the Cuisinart. If you don’t have the juicer thingy, just squeeze the juice out of them over some sort of sieve or strainer to catch the seeds. Good gracious was this method easy. The perfectly minced rind bits were then reunited with the juice in my juicer cup.
*I’ve only used Meyer lemons because they’re special. You can eat the rinds, without having to candy them (like you would need to for a regular lemon). If you’re making this when Meyers aren’t around or available, follow the directions in this step, but use two or three reg lemons (instead of one Meyer) and instead of throwing in the whole peel, zest the peels instead. I don’t have a zester (yet), so if I were zesting, I’d use the fine end of my cheese grater. You’ll want around 1 to 1.5 Tablespoons of zested peel.
Step 5: In a medium-sized mixing bowl, combine the following:
lemon pulp/rind mixture
1 large egg
2/3 cup plain yogurt or buttermilk (whatever fat content is fine)
1/3 cup milk of choice
5 Tablespoons melted unsalted butter
1 teaspoon vanilla extract
Step 6: Make a well in the center of the dry ingredients and pour in wet mixture. Stir until the wet is fully incorporated into the dry, but don’t beat the batter. The baking soda and baking powder are activated and you don’t want to beat out the gasses they’re producing in your mixture (or your muffins will be flat and dense).
Step 7: These will be super sticky. I recommend using a spoon and a finger to drop 1 Tablespoon-sized (for mini muffins) or 2 Tablespoon-sized (for regular muffins) dollops in the prepared muffin tin. You will have excess batter in your bowl, either wait for the first batch to bake and reload your muffin tin, or grease a loaf pan or other small oven-save dish and make a little muffin-loaf.
Step 8: Bake for about 7 minutes, check them, rotate pan in the oven for even distribution of heat. Bake for another 5-7 mins. The larger the muffins (or loaf pan) the longer they’ll need to cook. Use your nose as a guide, you’ll start to smell the lemon cooking, at which point they’re usually close to done. Or, have a few toothpicks on hand (or a steak knife, since I never seem to have toothpicks) and insert one in one of the larger muffins. If it comes out clean (no gooey batter remnants), pull ‘em out!
Step 9: Let cool in the pan for a couple minutes, then transfer your muffins to a cooling rack (or a clean, wire office tray, since I’ve yet to invest in a cooling rack).
Step 10: Eat (or freeze) within 2-3 days. The texture is best on the first day. I don’t recommend refrigerating them. Just keep them on the counter in a waxed paper bag or a tupperware box.
I’m a chronic modifier when it comes to muffin recipes, so relax about exactitudes and just see what happens. I haven’t failed in the muffin department yet!
If you end up with a dense (or 3-day-old) muffin, try making French toast with it: a sure-fire way to turn Meh, into YUM.