
 My friend Julia is always up to cool stuff. Turns out Julia and I had a mutual friend (whom we’re both very close to), and discovered this after we met via blogland last year. When I finally met Julia in real life (IRL, if you will) I got to meet her adorable, charming kiddo and pick strawberries (my first time in a strawberry patch) all in one!
Julia turned me onto the notion that I could stop spending $4 every time I encounter a recipe that calls for buttermilk. Her post (and nod to her own inspiring friend) tells you everything you need to know. I’ll share with you how I’ve managed to do it.
You’ll start out buying one more carton of buttermilk to get things going (you need those bacteria cultures), but after this, you shouldn’t ever need to buy another!
You could always start your own buttermilk cultures, but I don’t know how to do that yet, so I can’t tell you how easy or challenging that might be. [I have a hunch that it’s not very hard at all; yogurt- and cheese-making is on my 2011 how-to learning list.]
DIY buttermilk recipe
yields 1 quart jar
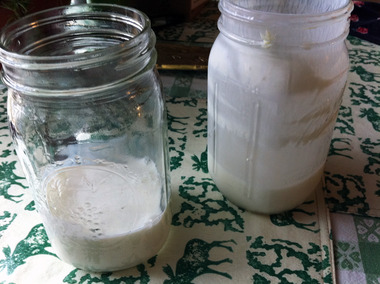
1. I use a freshly-washed quart jar and lid.
2. Fill jar to the 8oz-marker (1 cup) with existing, cultured buttermilk. (Make sure you buy ‘cultured buttermilk’)
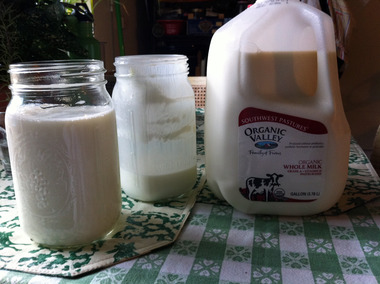
3. Pour regular (hopefully organic) milk to fill the rest of the jar. Use whatever fat percentage you have. Mine is whole milk, but any will do.
4. Wipe any spills from around the rim and add a lid. Place it on your kitchen counter or in a cupboard for 24 hours.
The next day, give it a good shake and discover gleefully that it has thickened up (thank you good bacteria!), and then place it in the fridge. I’ve found that mine lasts pretty much indefinitely, though you should probably use it within a month. Shake well before every use.
5. As your buttermilk supply dips lower in your jar, reserve 8 oz for your next batch. Use a clean jar and repeat the process!
Note: If you wait too long to make another batch (more than a month), your cultures might not be as potent. If you notice a still-quite-liquid milk after you’ve had it out for 24 hours, try adding a dollup of sour cream and let that sit out until it thickens. Sour cream shares the same microbes as buttermilk, and will help kick your jar into gear.
You’ll be surprised at all the delicious things you come up with when you have buttermilk on hand to use up. I made these gluten-free orange vanilla buttermilk muffins yesterday morning as a result of a surplus that needed to be moved along. Recipe to come, stay tuned!
Read on and check out the great comments below for tips on what to use in lieu of buttermilk in a pinch and other creative ideas for using up your buttermilk.